
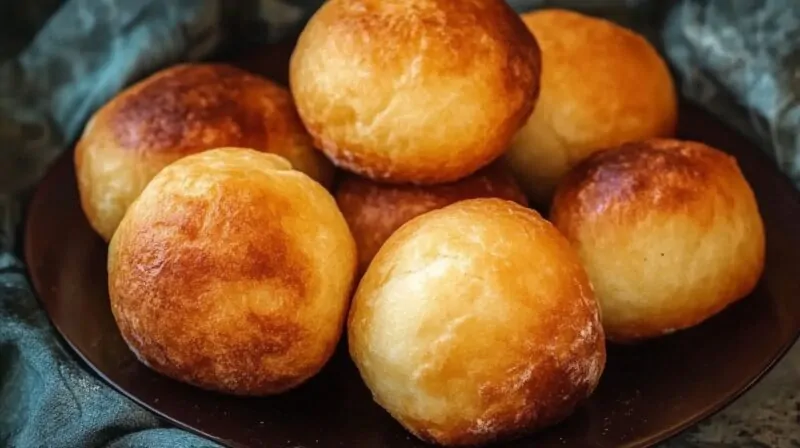
There’s just something about vetkoek that feels like home. The smell, the warmth, the way it crunches lightly when you bite in and then melts into soft, fluffy dough – it’s the kind of food that makes you stop and smile. It’s simple, it’s filling, and it hits the spot every single time.
In South Africa, vetkoek is one of those things everybody knows. You’ll find it at markets, school tuck shops, roadside stands, and of course, in kitchens where someone’s auntie or gran has a pot of oil going. It’s deep-fried dough, golden and puffed, and it can be eaten plain, sweet, or stuffed with savory fillings like spicy mince, curried chicken, or even cheese and polony.
There’s nothing fancy about it, and that’s what makes it great. You don’t need fancy ingredients or special skills. Just some flour, a bit of yeast, and a bit of love. It’s comfort food at its best — hot, fresh, and made to be shared with people you care about.
So let’s make some. You’ll be surprised how easy it is, and once you’ve had one bite, you’ll know exactly why vetkoek is such a favorite.

Crispy & Fluffy Vetkoek Recipe
Equipment
- Wooden spoon or dough hook (for mixing)
- Large mixing bowl
- Clean kitchen towel or plastic wrap (for proofing)
- Heavy-bottomed pot or deep fryer (for frying)
- Slotted spoon or tongs
- Wire rack or paper towels (for draining excess oil)
Ingredients
For the Dough:
- 4 cups all-purpose flour
- 2 tsp instant dry yeast
- 1 tbsp sugar
- 1 tsp salt
- 1 ½ cups warm water not hot
- 1 tbsp vegetable oil optional – makes dough easier to handle
For Frying:
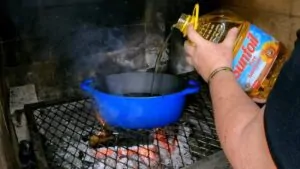
- 3 –4 cups vegetable oil sunflower or canola works best
Instructions
- Mix the dry ingredients:In a large bowl, combine flour, yeast, sugar, and salt. Stir to distribute evenly.

- Add warm water:Gradually pour in the warm water while mixing with a wooden spoon or your hand. Mix until a sticky dough forms.

- Knead the dough:Transfer to a lightly floured surface. Knead for 8–10 minutes until smooth and elastic. (Or use a stand mixer with a dough hook.)

- Let it rise:Return the dough to the bowl, cover with a towel or plastic wrap, and place in a warm area. Let rise for about 1 hour, or until doubled in size.

- Shape the vetkoek:Gently punch down the dough. Divide into 10 equal pieces and shape into balls or slightly flattened ovals. Let rest for 10–15 minutes.

- Heat the oil:Pour oil into a heavy pot and heat over medium. Test readiness with a small piece of dough — if it sizzles and rises, you're good to go.
- Fry the vetkoek:Fry in batches for 2–3 minutes per side, or until puffed and golden brown. Avoid overcrowding the pot.

- Drain and cool:Use a slotted spoon to remove from oil and place on a wire rack or paper towels to drain excess oil.

- Serve hot:Enjoy them plain, with butter and jam, or filled with savory delights like curried mince, grated cheese, or even a fried egg.

Video
Notes
- Be patient with rising: The longer the dough rises, the lighter the result. Don’t rush it.
- Watch your oil temp: Too hot, and they’ll burn outside and stay raw inside. Medium heat is best.
- Flavor variations: Add more sugar for a sweeter version or spices (like cumin or chili flakes) for a savory twist.
- Reheating tip: Leftover vetkoek can be crisped up in the oven at 180°C (350°F) for about 5–8 minutes.
Additional Tips
1. Add a pinch of turmeric or paprika to the dough
This gives the vetkoek a slightly warm color and adds a subtle earthy flavor. Especially nice if you’re planning on stuffing it with curry or something spicy.
2. Rub a clove of garlic on the inside of sliced-open vetkoek
It gives you a fast punch of flavor without needing extra sauces. Just rub it lightly while it’s still hot — perfect for savory fillings.
3. Stuff it with cheese while it’s still hot

Slice the vetkoek open fresh out the oil and toss in some grated cheddar or mozzarella. Close it up and the heat melts it perfectly. No extra steps needed.
4. Freeze the dough after first rise
Once the dough has risen, shape it into portions and freeze them. When you’re ready, let them thaw, rise a bit, and fry. Saves time and still tastes fresh.
5. Double fry for max crunch
Fry the vetkoek until golden, let them rest for a few minutes, then drop them back in the oil for about 30 seconds. You’ll get a crispier outside with that same soft inside.
6. Spice the oil
Before frying, toss in a small piece of garlic, chili, or even a herb like thyme while the oil heats up. It adds a light flavor to the oil that makes a subtle difference.
7. Keep leftover oil for flavor
If the oil isn’t burnt, strain and save it. Next time you fry something like chicken or another batch of vetkoek, that seasoned oil brings extra depth.
8. Use a soup ladle for sticky dough
If your dough is a bit too sticky to handle, lightly oil a soup ladle and scoop portions straight into the hot oil. Less mess, perfect round vetkoek.
9. Add a dash of vinegar to the water
A small splash (about a teaspoon) of vinegar in the water you mix into the dough gives it a faint tang and improves texture. Great for balancing rich fillings.
FAQs
My dough isn’t rising – what now?
Two possible reasons: your yeast is dead, or your water was too hot and killed it. Test yeast next time in warm water with sugar before mixing it in — it should foam in 5–10 mins. If not, toss it.
My vetkoek came out flat – what went wrong?
Either your dough didn’t rise properly or you flattened it too much before frying. Let it puff up before frying, and don’t press the shape down too hard — just a gentle hand-roll is enough.
Can I fix over-proofed dough?
If your dough rose too much and collapsed, knead it lightly again and let it rest 15–20 mins before frying. Don’t expect perfect puffiness, but it’ll still be tasty and better than wasting it.
How do I stop the vetkoek from soaking up too much oil?
Your oil isn’t hot enough, or you’re frying too long. If oil temp is too low, dough absorbs it like a sponge. Use a test piece — it should float up and sizzle right away. And don’t leave them in forever.
How long can the fried vetkoek stay good?
Best on the day, but you can keep them 1–2 days in an airtight container. Reheat in the oven to bring the outside back. After that? They go stale and heavy — not worth it.
Last Words
You started with flour, water, and a little bit of yeast — nothing fancy. Just a bowl of dough and the smell of hot oil filling the kitchen. And then, one by one, those golden pillows came out of the pot, puffed and perfect, ready to be torn open and filled with whatever you had lying around.
That’s the thing with vetkoek — it’s not trying to impress anyone. It’s just good food that’s always there when you need it. It feeds people. It brings people together. And the best part? Once you’ve made it, you’ll never need a recipe again. Your hands will remember.
Another traditional recipe to try – Traditional Jollof Rice